This months challenge at By the Cute and Girly, chosen by ace crafter Ayelet, is "Spring is in the Air". Today in Dublin with the rain belting down non-stop it is very hard to think of anything but the wet stuff being in the air....but perhaps a bit of crafting and the lovely prizes from our sponsors might inspire you to create some Spring makes!
Details of challenge HERE. Remember BTC&G is an all crafts welcome challenge blog, not just for papercrafts..
The prizes from our fabulous sponsors:
$20 Gift certificate from Simon Says Stamp
£10 Gift Certificate from Joanna Sheen
For my Spring make I have created a little bird in a bower ornament from card, paper, glue and a few embellishments.
 Here's how you can make one similiar.
 To make the frames I have secured 2 nesting dies together with masking tape. I used Spellbinders Labels 22 but any nesting label type dies should be ok.
 Cut 2 frames from card and 4 from patterned paper
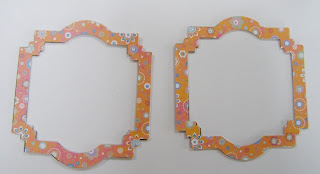 Glue paper frames on to either side of card frames and let them dry
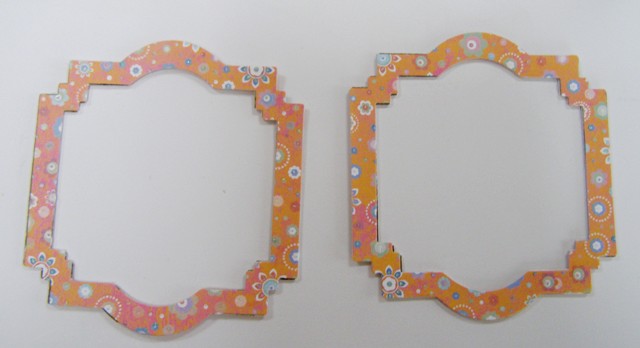
 I have stamped my frames in green ink with a small swirly stamp but this is not essential
 Decorate the frames (I used a few(!) pearls). This is best done before assembling the frames
 Level off the bottom edge of both frames so that the ornament will stand steady once assembles (just cut it straight across). This isnt necessary if you intend to hang up the ornament.
 Cut one frame in half vertically
 Get the bird ready. I have used two small flat wooden birds and glued them together with a length of ribbon stuck in between them for hanging. You could use a metal bird charm, a die cut bird or even a photo in a frame. It doesn't even have to be a bird.
For the blue ornament I sat the bird on a little branch from the garden. There are all sorts of variations....
 Glue ribbon to top of (uncut) frame. Make a loop if you want to hang the finished ornament
 Glue the half frames back on to the uncut frame at right angles to it. I used a hot glue gun for this

Decorate your little ornament. If you have a hanging loop you will have to punch a hole through and flowers on the top of the ornament to allow the ribbon to come up.
Here's another I made a few weeks ago

Back later with the results of my giveway/competition...
Ger x
Details of challenge HERE. Remember BTC&G is an all crafts welcome challenge blog, not just for papercrafts..
The prizes from our fabulous sponsors:
$20 Gift certificate from Simon Says Stamp
£10 Gift Certificate from Joanna Sheen
For my Spring make I have created a little bird in a bower ornament from card, paper, glue and a few embellishments.


For the blue ornament I sat the bird on a little branch from the garden. There are all sorts of variations....


Decorate your little ornament. If you have a hanging loop you will have to punch a hole through and flowers on the top of the ornament to allow the ribbon to come up.
Here's another I made a few weeks ago

Its taller, made with a Go Kreate die set, plain card inked with Distress Inks and a spun cotton bird (you can buy these on Etsy). The bird is sitting on a swing made from a bit of card and some string. I have added a little yellow crochet doiley at the top.
If you have any questions please leave a comment, and I will try to help. Now don't forget to enter you Spring-y creations in the challenge!Back later with the results of my giveway/competition...
Ger x
What a gorgeous creation Geraldine, love what you have created here, must give this a go. Carolxx
ReplyDeleteThese are lovely Ger, great makes.
ReplyDelete** Kate **
These are FAB great tutorial too :) x
ReplyDeleteGeraldine, your project is absolutly amazing
ReplyDeletehugs
céline
geraldine your project is absolutly amazing!
ReplyDeletehus
céline
What a stunning and inspirational piece Geraldine.
ReplyDeleteB x
Beautiful Geraldine, very clever, thanks for the tutorial, take careX:)
ReplyDelete